
Reviewed · BANGKOK
Thailand eSIM (3 to 30 days, up to 60GB)
A Thailand eSIM can save your first hours. This one is interesting because you do not hunt for an airport SIM, you scan a QR code, and you start using data quickly after arrival in Bangkok. I like that setup is designed to be simple, and you can choose a plan length from 3 to 30 days depending on how long you are away.
What I especially like is the strong day-one practicality, plus the data performance. In my notes from people using it, the connection feels reliable, with comments calling out very good speed right after landing. One drawback to plan around: you need to be prepared for eSIM setup, and some Google services may be hit or miss for uploads, so do not assume everything works exactly like your home connection.
In This Review
- Key Highlights Worth Knowing
- Getting Connected Fast in Bangkok with a Thailand eSIM
- Price and Value: Why Paying $5 Can Still Make Sense
- Before You Leave: Phone Compatibility and What You Must Check
- Activation Day: QR Code, Email Delivery, and Roaming
- Using Your Data in Thailand: 4G/5G Where Available, Then 3G
- What Worked Best: Messaging and Social Apps
- The One Headache to Watch: Google Photos Uploads
- Convenient Self-Service, With Real Limits
- Coverage Notes: Read the Fine Print Before You Assume
- Practical Tips I Use to Avoid eSIM Day Mistakes
- Who This Thailand eSIM Is Best For
- Should You Book This Thailand eSIM?
Key Highlights Worth Knowing

- Email delivery, no pickup so you can handle everything before you even pack.
- QR-code activation built around fast phone setup and quick connection.
- 4G/5G data where available for navigation and messaging once you arrive.
- High-speed data cap, then speeds drop to 3G for the rest of your plan.
- Works well for common apps, with WhatsApp and Facebook called out as working.
- Compatibility check matters, since the eSIM only works on supported phones.
Bangkok doesn't stop at one stop, so here's what else is close by.
Getting Connected Fast in Bangkok with a Thailand eSIM
Bangkok is a great place to test any travel data plan, because your first day usually involves a lot of tapping: maps, rides, translations, and trying to find the right street without wandering in circles.
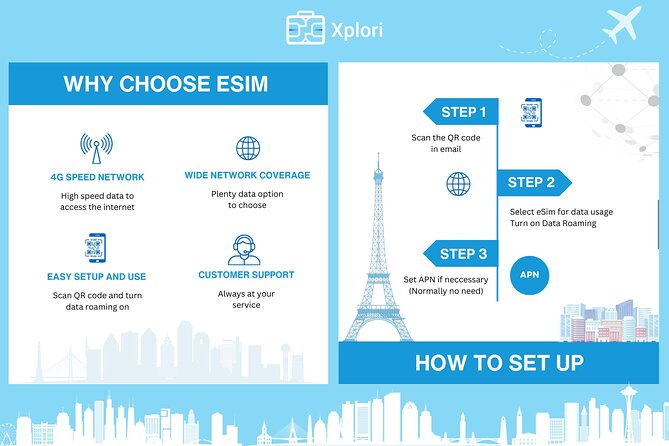
This Thailand eSIM is designed for exactly that first-day stress. Instead of going to an airport counter and dealing with language barriers, you order, then get your eSIM details by email. You scan a QR code to install the eSIM profile on your phone. The goal is clear: get you online fast, without waiting in line.
The process is also built to reduce the classic travel trap: you land, you have no data, and suddenly every decision turns into a guessing game. With this setup flow, you are expected to prepare before you leave, then activate once you are in Thailand and enable data roaming.
Price and Value: Why Paying $5 Can Still Make Sense
$5 per person is cheap enough that it is easy to ignore the fine print. But with an eSIM, the value is not just the sticker price. It is what you avoid: airport SIM queues, repeated activation steps, and that uneasy feeling of being disconnected while you figure out where you are.
This is also a flexible product. If you are taking a short trip, you can pick a shorter window. If you are stretching it out, the plan length can go up to 30 days. That matters because you do not want to pay for extra time you never use.
Now, I will be honest about the tradeoff that comes with low cost. When a service is simple, you have to handle your setup correctly on your own. There is no physical meetup point where someone hands you anything. If you are the type of traveler who likes help and step-by-step guidance in person, you might find that you need to be extra organized here.
Before You Leave: Phone Compatibility and What You Must Check

Before you buy, check your phone supports eSIM. The guidance is specific. It mentions models like iPhone XS and later, Pixel 3 and later, and Samsung S20, S21, or Fold.
If your phone is older or does not support eSIM, you will be stuck. And because this is a digital product, there is no easy fallback like swapping in a plastic SIM at the last minute. Think of this as a quick pre-flight check you do once, so you do not troubleshoot after you land.
Also check the practical side: you are going to need an internet connection to activate the eSIM. The activation step requires internet access, so plan how you will get online to do that final step. Many people do it by using a hotel Wi-Fi network or any connection they have available on arrival day.
Keep scrolling, there's usually one more worth booking.




Activation Day: QR Code, Email Delivery, and Roaming
Here is what you should expect and how to make it smooth.
You receive your eSIM by email. Then you scan the QR code and install the eSIM profile on your phone. The setup flow is quick, but there is one important detail: you should set up your eSIM on the same day as your departure date, and then activate the plan when you reach Thailand and enable data roaming.
That timing matters. If you wait until you land and then try to set everything up while you are also trying to find transit, you will rush. Rushing is where errors happen.
A practical tip I strongly recommend: print the QR code and carry it with you as a precaution. If your phone battery is low, or if you lose access to the email account you used, a paper copy can save you. It sounds old-school. It works anyway.
Also note the plan is built around activation. After installation, you still need to enable data roaming in Thailand to actually use the mobile data.
Using Your Data in Thailand: 4G/5G Where Available, Then 3G
Once your plan is active, you get mobile data for the duration you selected. The data is described as 4G/5G where available, which is what you want for navigation and quick updates.
But there is a ceiling on high-speed usage. The plan includes a stated data amount for high-speed performance. After that cap, the data speed switches to 3G.
What does that mean for your day-to-day? If you are using maps, checking messaging apps, and sharing photos occasionally, you can usually stay productive on capped data. If you plan to stream video for long stretches, upload large files, or run heavy photo backups continuously, you might feel the drop after the high-speed portion ends.
So before you fly, think about your usage style:
- Light to moderate use fits well for most trip planning needs.
- Heavy uploading or long video sessions might require more careful timing and Wi-Fi use.
What Worked Best: Messaging and Social Apps
The strongest practical feedback points to apps that people rely on immediately in a new city. WhatsApp and Facebook were specifically mentioned as working well, with one note saying the card was fine for using those apps.
That aligns with how most travelers actually use data early on: send a message home, coordinate a meet-up, check social updates, and confirm plans. If that is your priority, this eSIM is built for that reality.
Another plus from the feedback is setup convenience and speed. People mentioned the eSIM setting is convenient and that it can be used as soon as you get off the plane. That is exactly what you want, because the first connection is when you need it most.
The One Headache to Watch: Google Photos Uploads
One review flagged a limitation: Google Photos did not work for uploading photos. The note is in Spanish, but the meaning is clear. WhatsApp and Facebook worked, but Google Photos upload was not working.
I would not treat that as proof that all Google Photos behavior is broken everywhere for everyone. Still, you should plan around it. If you depend on Google Photos auto-backup, you might be safer turning off auto-upload before you arrive, and using Wi-Fi for backups when possible.
Think of it like this: messaging tends to be forgiving. Photo uploads can be more sensitive to speed caps, background syncing, and network behavior. If your travel memory depends on Google Photos uploading right away, bring a backup plan.
Convenient Self-Service, With Real Limits
This is a purely digital product. There is no pickup or meetup and no physical handoff. Delivery is by email, and your job is to activate it.
That is great when you are organized. You can do it at your pace. It is not great when you are traveling last minute or you like relying on on-site help.
One piece of practical advice came through in the feedback: do not leave it to chance the day you fly. Make sure you purchase ahead so you have your QR code and eSIM details ready. The comment called out that you will not receive it automatically, so you should not count on surprise delivery timing.
If you buy too late, you lose the main benefit of an eSIM, which is preparing before you need it.
Coverage Notes: Read the Fine Print Before You Assume
The plan description includes a line stating the data plan covers all Canadian provinces. That is unusual for a Thailand data product, so I strongly suggest you double-check your actual usage destination in the confirmation details you receive by email.
Because you are traveling internationally, what matters is whether roaming on the Thailand network is enabled and functioning for your selected plan. Do not rely on the Canadian-provinces wording alone.
If you are unsure, contact the provider in advance. The info says you can reach out if you are unsure about eSIM support or setup.
Practical Tips I Use to Avoid eSIM Day Mistakes
If you want this to feel painless, follow a simple checklist.
First, confirm eSIM support on your phone before you buy. Second, make sure you have access to the email account where the QR code is sent. Third, set up your eSIM on your departure day as suggested, and then activate and enable roaming when you arrive in Thailand.
Then, carry a backup:
- Print the QR code as recommended.
- Screenshot the email instructions.
- Ensure your phone has enough battery to finish the setup.
Finally, test your connection in the first hours after activation. Open a map app and a messaging app. If those work, you are in good shape for the trip.
Who This Thailand eSIM Is Best For
This is a great fit for:
- Short trips to Bangkok where you want fast data on arrival.
- Longer stays where you would rather not manage airport SIM logistics.
- Anyone who prefers controlling activation on their schedule.
It may be less ideal for:
- Travelers who do not want to do any setup at all.
- People who depend on continuous Google Photos uploading while on the go.
- Anyone with a phone that does not support eSIM.
If you are comfortable with a little tech prep, you will probably love the convenience. If you hate setup, you might still succeed, but you should plan time for it.
Should You Book This Thailand eSIM?
If you want quick connectivity in Bangkok without airport hassle, I think this is a solid buy, especially at the $5 price point. The combination of email delivery, QR-code activation, and 4G/5G data where available is exactly what you want for navigation and day-one messaging.
I would book it if you can do two things well: verify your phone supports eSIM, and set it up before you land. If you rely heavily on Google Photos backups, I would treat that as your main risk and plan to use Wi-Fi for backups.
Bottom line: for most travelers who need reliable data for planning and communication, this eSIM is a practical, low-cost way to stay connected. Just do not wait until the last minute, and plan around that 3G speed after the high-speed cap.
The newest additions around Bangkok
- Dream World & Snow Town in Bangkok with Return Transfer & Lunch
★ 4.5 · 3 reviews - Bangkok: Nong Nooch Garden
★ 5.0 · 3 reviews - Private tour to Ayutthaya and Lopburi Monkey Temple (from Bangkok)
★ 5.0 · 3 reviews - Guided Tour of Grand Palace & Emerald Buddha Temple in Bangkok
★ 5.0 · 3 reviews - Half Day DIY Grand Palace and Emerald Buddha Temple
★ 4.5 · 3 reviews - HD-01 Koh Rattanakosin old town cycling with The Giant Swing, and more
★ 5.0 · 3 reviews - Private Tour: The Best of Bangkok Temples – Half Day
★ 4.0 · 3 reviews - Glittering Ayutthaya Tour to Famous Sights, Market & Sunset Boat
★ 4.5 · 3 reviews